Microscopes: Types, Parts, and Practical Applications
Lesson Overview
- What Is a Microscope?
- What Were the Early Developments in Microscopy?
- What Are The Various Types of Microscopes and Their Applications?
- Specialized Components by Microscope Type
- What Are The Various Components of a Compound Microscope and its Functions?
- Key Components of a Compound Microscope
- How Do These Components Work Together?
- A Simple Guide to Using a Microscope
- Various Formulas Used in Microscope Readings
- Tips on How to Maintain a Microscope
- Conclusion
What Is a Microscope?
A microscope is a device engineered to visualize objects that are too small for the naked eye, magnifying tiny details to a scale that humans can analyze and understand. This tool is fundamental in various fields such as biology, medicine, materials science, and environmental studies, providing insights that drive innovation and discovery across disciplines.
What Were the Early Developments in Microscopy?
c.1595: Dutch spectacle makers Hans Janssen and his son Zacharias developed the first compound microscope.
1665: Robert Hooke published Micrographia, featuring remarkable studies of living organisms seen and drawn using a microscope.
1675: Dutch businessman Antonie van Leeuwenhoek created some of the earliest practical microscopes with high-quality glass lenses, making the first observations of bacteria and protozoa.
1815: Film photography pioneer William Henry Fox Talbot and later physicist David Brewster developed the polarizing microscope.
1873: German physicist Ernst Abbe discovered that the fundamental nature of light limits what can be resolved with conventional optical microscopes, leading to the development of electron microscopes.
1911: Carl Zeiss and Carl Reichert invented the fluorescence microscope.
1931: German scientists Max Knoll and Ernst Ruska created the magnetic electron objective lens, the core component of an electron microscope.
1932: Frits Zernike invented the phase contrast microscope.
1933: Ernst Ruska constructed the first practical transmission electron microscope.
1935: Max Knoll invented the first scanning electron microscope (SEM).
1981: Gerd Binnig and Heinrich Rohrer invented the scanning tunneling microscope (STM), earning the 1986 Nobel Prize in Physics along with Ernst Ruska.
What Are The Various Types of Microscopes and Their Applications?
1. Simple Microscope
- Principle: Utilizes a single convex lens to magnify objects by bending light rays, similar to a magnifying glass. This straightforward design allows for basic magnification, making it suitable for examining relatively large specimens.
- Applications:
- Basic Inspection: Useful for simple magnification tasks.
- Field Work: Portable and convenient for examining specimens in the field.
- Education: Helps young students understand basic magnification.
- Basic Inspection: Useful for simple magnification tasks.
2. Compound Microscope
- Principle: This type of microscope uses multiple lenses to achieve high magnification. Light passes through the specimen, allowing for the detailed observation of transparent specimens.
- Applications:
- Biology: Ideal for examining small organisms, cells, and biological tissues.
- Medical Science: Used for diagnosing diseases by examining blood samples, bacteria, and other pathogens.
- Educational Purposes: Commonly found in classrooms for teaching biology and related sciences.
- Biology: Ideal for examining small organisms, cells, and biological tissues.
3. Stereo Microscope (Dissecting Microscope)
- Principle: It provides a three-dimensional view of the specimen by using two separate optical paths for each eye. It offers lower magnification compared to compound microscopes.
- Applications:
- Botany: Used for dissecting and examining plant structures.
- Manufacturing: Employed in the quality control of small components.
- Education: Facilitates the study of larger specimens where depth perception is necessary.
- Botany: Used for dissecting and examining plant structures.
4. Electron Microscopes (TEM and SEM)
- Principle: It utilizes beams of electrons instead of light to magnify images, achieving much higher resolutions.
- Applications:
- Material Science: Analyzing the microstructure of materials.
- Microbiology: Observing the fine details of microorganisms.
- Nanotechnology: Essential for research and development at the nanoscale.
- Material Science: Analyzing the microstructure of materials.
5. Digital Microscope
- Principle: Combines traditional optics with a digital camera, displaying images on a computer monitor, allowing for easy sharing and analysis.
- Applications:
- Education: Enhances learning by allowing a group of students to view and discuss the image simultaneously.
- Research and Development: Useful in documenting experiments and sharing findings.
- Industrial Inspection: Used for inspecting manufacturing defects and ensuring quality control.
- Education: Enhances learning by allowing a group of students to view and discuss the image simultaneously.
6. Confocal Microscope
- Principle: It uses laser light to scan specimens with fluorescent tags sequentially, producing high-resolution, three-dimensional images by focusing precisely at various depths.
- Applications:
- Biomedical Research: Vital for detailed study of cellular structures and complex tissues.
- Genetics: Helps in understanding gene expression in cells.
- Pharmacology: Used to observe how drugs interact with cells.
- Biomedical Research: Vital for detailed study of cellular structures and complex tissues.
7. Phase-Contrast Microscope
- Principle: It enhances the contrast in transparent and colorless objects by converting phase shifts in light passing through the specimen into brightness changes in the image.
- Applications:
- Cell Biology: Enables viewing live cells and tissues without the need for staining.
- Microbial Studies: Allows for the observation of bacteria, yeast, and other microorganisms in their natural state.
- Cell Biology: Enables viewing live cells and tissues without the need for staining.
8. Fluorescence Microscope
- Principle: It excites fluorochromes within the specimen with a specific wavelength of light, causing them to emit light of a different wavelength.
- Applications:
- Molecular Biology: Used to observe the locations of specific proteins and other molecules in cells and tissues.
- Pathology: Helps in diagnosing diseases by detecting specific markers in tissue sections.
- Molecular Biology: Used to observe the locations of specific proteins and other molecules in cells and tissues.
Specialized Components by Microscope Type
Electron Microscope (TEM/SEM):
- Electron Gun: Generates a beam of electrons used for imaging the specimen.
- Electromagnetic Lenses: These lenses focus the electron beams to form a clear image.
- Specimen Chamber: Holds the specimen in place during analysis.
- Detectors: Capture the electrons that interact with the specimen to create an image.
- Vacuum System: Maintains a vacuum environment to allow the free travel of electrons without interference from air molecules.
2. Stereomicroscope (Dissecting Microscope):
- Binocular Head: Provides a 3D view by allowing observation through two eyepieces.
- Light Sources (Top and Bottom): Provide both incident and transmitted illumination to enhance the viewing of specimens from different angles.
3. Fluorescence Microscope:
- Mercury/LED Lamp: Provides the necessary illumination to excite fluorochromes within the specimen.
- Filter Cube: Separates the excitation light from the emitted light, ensuring only the fluorescence signal is observed.
4. Confocal Microscope:
- Laser Source: Excites fluorescence in specimens by providing a precise and focused light source.
- Pinhole Aperture: Improves the resolution of the image by eliminating out-of-focus light, creating sharp and detailed images.
5. Polarizing Microscope:
- Polarizer and Analyzer: These filters manipulate polarized light to enhance contrast in specimens, making it easier to observe features that are not visible with regular light microscopy.
6. Digital Microscope:
- Camera and Monitor/Computer Interface: Captures digital images of the specimens and displays them on a monitor or computer, allowing for easy sharing, analysis, and documentation.
What Are The Various Components of a Compound Microscope and its Functions?
Understanding the anatomy and functions of a microscope is crucial for effectively using this intricate tool. Each part of a microscope is designed to contribute to its overall ability to magnify and resolve the details of tiny objects. Here, we'll explore the key components of a typical compound microscope, commonly used in educational and research settings.
Key Components of a Compound Microscope
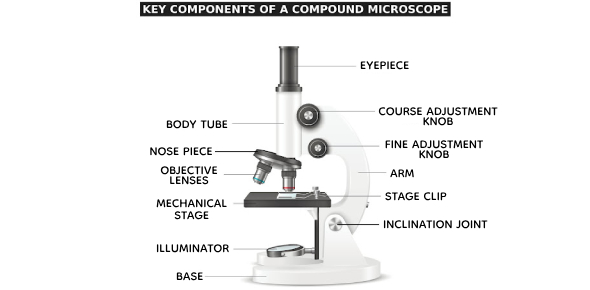
The components of a compound microscope are categorized into:
- Mechanical Parts
- Optical Parts
(A) Mechanical Parts of a Compound Microscope
- Foot or Base:
- U-shaped structure that provides support for the entire microscope.
- U-shaped structure that provides support for the entire microscope.
- Pillar:
- Vertical projection that stands on the base and supports the stage.
- Vertical projection that stands on the base and supports the stage.
- Arm:
- Strong, curved structure used to handle the microscope.
- Strong, curved structure used to handle the microscope.
- Stage:
- Flat, rectangular platform attached to the lower end of the arm. Holds the specimen for examination, with a central hole allowing light to pass through.
- Flat, rectangular platform attached to the lower end of the arm. Holds the specimen for examination, with a central hole allowing light to pass through.
- Inclination Joint:
- Joint where the arm is attached to the pillar, allowing the microscope to tilt.
- Joint where the arm is attached to the pillar, allowing the microscope to tilt.
- Clips:
- Two clips on the upper stage that hold the slide in place.
- Two clips on the upper stage that hold the slide in place.
- Diaphragm:
- Attached below the stage to control and adjust the intensity of light passing through the specimen.
- Two types:
- Disc Diaphragm
- Iris Diaphragm
- Attached below the stage to control and adjust the intensity of light passing through the specimen.
- Nosepiece:
- Circular, rotating metal structure connected to the lower end of the body tube, housing objective lenses.
- Circular, rotating metal structure connected to the lower end of the body tube, housing objective lenses.
- Body Tube:
- Hollow, tubular structure on the upper arm. Moves up and down with the adjustment knobs.
- Hollow, tubular structure on the upper arm. Moves up and down with the adjustment knobs.
- Fine Adjustment Knob:
- Smaller knob for precise focusing of the specimen.
- Smaller knob for precise focusing of the specimen.
- Coarse Adjustment Knob:
- A larger knob used to move the body tube up and down for bringing the specimen into focus.
(B) Optical Parts of a Compound Microscope
- Eyepiece Lens (Ocular):
- Lens at the top of the body tube for viewing the magnified image. Marked with magnification power (e.g., 5x, 10x, 15x).
- Lens at the top of the body tube for viewing the magnified image. Marked with magnification power (e.g., 5x, 10x, 15x).
- Mirror:
- Found attached to the pillar or the lower end of the arm. Has a concave mirror on one side and a plain mirror on the other to reflect light into the microscope.
- Found attached to the pillar or the lower end of the arm. Has a concave mirror on one side and a plain mirror on the other to reflect light into the microscope.
- Objective Lenses:
- Connected to the revolving nosepiece at the bottom of the body tube. The three main objective lenses include:
- Oil Immersion Objective: 100x magnification
- High Power Objective: 45x magnification
- Low Power Objective: 10x magnification
- Oil Immersion Objective: 100x magnification
- Connected to the revolving nosepiece at the bottom of the body tube. The three main objective lenses include:

Fig: Xylem, phloem, and ground tissues in monocot stem under a compound microscope with 400x magnification.
Take This Quiz:

How Do These Components Work Together?
The proper use of a microscope involves several steps that engage different parts of its anatomy:
- Setting Up: Place the slide on the stage and secure it with the stage clips.
- Illumination: Adjust the illuminator for adequate light and use the condenser and iris diaphragm to focus the light beam directly onto the specimen.
- Magnification: Start with the lowest magnification objective lens to locate the specimen and gradually increase magnification by rotating the nosepiece to higher power objectives for detailed viewing.
- Focusing: Use the coarse focus knob to bring the specimen into general focus and fine-tune with the fine focus knob for a clear, sharp image.
(159).jpg)
A Simple Guide to Using a Microscope
Using a microscope effectively is an essential skill in many scientific fields. This practical guide will provide step-by-step instructions on how to properly set up and use a compound microscope, one of the most common types used in schools and laboratories.
Setting Up the Microscope
- Placement: Begin by placing the microscope on a stable, flat surface where there is adequate lighting. Ensure that the area is free of clutter and any potential hazards.
- Connecting to Power: If your microscope has an illuminator (light source), connect it to a power source. Make sure the cord is neatly arranged to prevent tripping or pulling.
- Preparing the Lenses: Clean the eyepiece and objective lenses gently with lens paper or a soft, lint-free cloth designed for optical surfaces. Avoid touching the lenses with your fingers to prevent oils from smudging the optical surfaces.
Loading the Slide
- Placing the Slide: Open the stage clips and place the slide on the stage. Carefully position the slide so that the specimen is over the center of the glass window. Secure the slide using the stage clips.
- Selecting the Objective Lens: Start with the lowest magnification objective lens. This makes it easier to locate the specimen. Rotate the nosepiece until the chosen lens clicks into place.
Focusing on the Specimen
- Using the Coarse Focus: Look through the eyepiece and slowly adjust the coarse focus knob to move the stage up. Continue until the specimen comes into rough focus.
- Refining with Fine Focus: Switch to the fine focus knob to clarify the specimen's image. Adjust very slowly until you get a sharp image.
Adjusting the Light
- Light Intensity: Adjust the illuminator's brightness if your microscope has this setting. Too much light can wash out details in the specimen, while too little light can make it hard to see.
- Using the Condenser and Diaphragm: Adjust the condenser to just below the stage if it is not already in position. Use the diaphragm to fine-tune the amount of light reaching the specimen. This helps to enhance contrast and detail in the image.
Viewing Different Areas and Magnifications
- Scanning the Slide: Use the mechanical stage controls (if available) to move the slide around and view different parts of the specimen. Always move the slide slowly to maintain focus and prevent damaging the slide.
- Changing Magnifications: After viewing the specimen at the lowest magnification, you may switch to higher magnifications to see finer details. Always refocus using the fine focus knob after changing objectives.
Finishing Up
- When Finished: Lower the stage, click the lowest power objective lens into place, and remove the slide. Turn off the illuminator and disconnect the power supply if necessary.
- Cleaning and Storage: Clean the microscope lenses again if needed. Cover the microscope with a dust cover and store it in a dry, safe place.
(160).jpg)
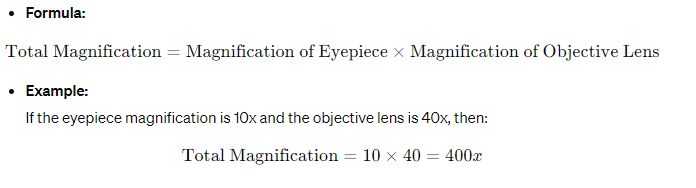
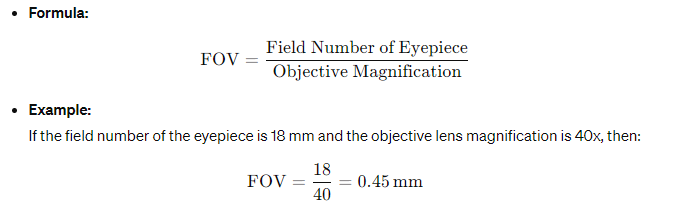
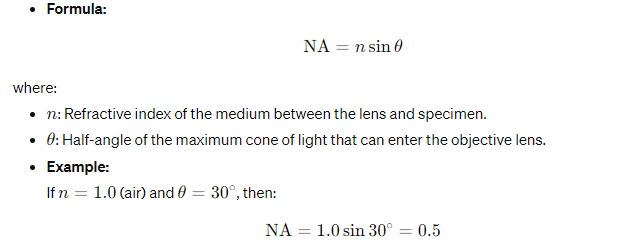
Various Formulas Used in Microscope Readings
- Total Magnification
- Field of View (FOV)
- Numerical Aperture(NA)
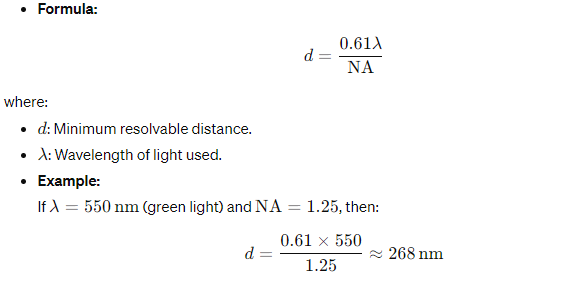
- Resolving Power (Resolution)
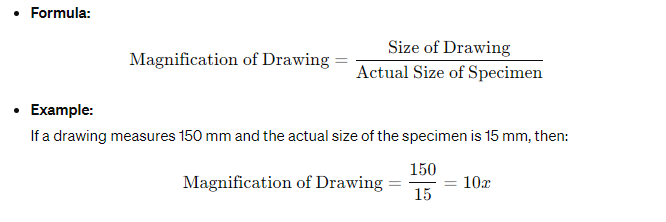
- Magnification of Drawing
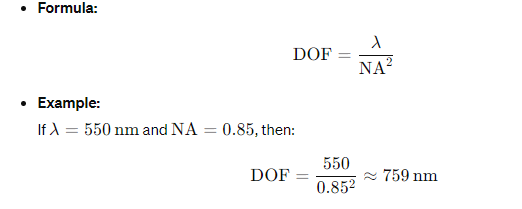
- Depth of Field (DOF)
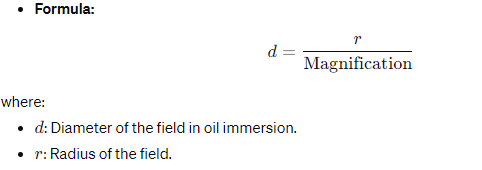
- Diameter of Oil Immersion Objective
Tips on How to Maintain a Microscope
- Regular Cleaning:
- Clean the lenses with lens paper or a lint-free cloth using lens cleaner.
- Avoid touching the lenses with your fingers to prevent smudging.
- Cover After Use:
- Always cover the microscope with a dust cover when not in use.
- Proper Storage:
- Store in a cool, dry place, free of humidity and direct sunlight.
- Keep away from chemicals and corrosive substances.
- Handle with Care:
- Carry the microscope by the arm with one hand while supporting the base with the other.
- Check and Replace Light Source:
- Ensure the illuminator bulb is functioning properly and replace it if necessary.
- Use Lens Caps:
- Keep objective lenses capped when not in use to prevent dust accumulation.
- Oil Immersion Lens Maintenance:
- Clean the oil immersion objective immediately after use with lens paper.
- Check Mechanical Stage:
- Regularly check for smooth movement and lubricate if necessary.
- Adjustment Knobs:
- Ensure coarse and fine adjustment knobs function smoothly.
- Avoid Rough Focusing:
- Always start with the lowest magnification and adjust gradually.
- Annual Maintenance:
- Schedule professional maintenance and calibration annually.
- User Manual Reference:
- Follow the manufacturer's guidelines for specific maintenance instructions.
Conclusion
In conclusion, this lesson on microscope equips you with a deep understanding of microscopes, enhancing your knowledge from the foundational principles to advanced applications. By examining the historical evolution, structural components, and various types of microscopes, you gain the skills necessary to understand the workings and use these critical and intricate scientific tools.
Whether your interest lies in academic research, medical diagnostics, or industrial applications, mastering microscopy through this course will significantly upskill your capabilities, opening up new possibilities for exploration and potential career advancements in the scientific community.
Rate this lesson:
 Back to top